Configure the HCM People Import-v2 Integration
How to configure connection settings and process properties for this integration.
This topic describes how to configure this integration.
This integration pack imports person records from Dimensions HCM by way of APIs.
Version 2 of the HCM People Import integration is simplified and has improved performance because it replaces most cross-reference tables or data maps with common employee records (CER) that map data between systems.
For details and instructions, see HCM Profile Setup and refer to the Unified WFM-HCM Features topic.Before you start
In order to run People Imports, your Function Access Profile the following access control points must be set to "Allowed." To access these access control points (ACP) from the Main Menu, select .
- Make sure that at least the default row is configured for the required HCM profiles:
- Select Main Menu
> Standard Profiles . - In Dimensions HCM, assign the HCM profiles to employees as follows: Select .
- Select Main Menu
- Deploy the Dimensions HCM People Import integration pack; see Deploy Integration Packs.
- Get the URL for the HCMAuthenticationServer from the tenant details.
- Get the following HCMAuthenticationProperties from the tenant details:
- username: This is the username for the account that accesses the APIs and all employee groups.
- password: For the same account
-
api-key: The API key calls the HCM REST APIs from the HTTP request header. Get the key as follows:
- Log in to the HCM Company tenant with an administrator user account.
- Find and select the Company.
- Click Tap Log in as SA.
- Select > the Company Config tab.
- Select and expand API Keys.
- Do one of the following:
If a key has been generated already, do not generate another one. Click Tap View
to show the API Key. Copy and use this key. If a key has not been generated, click tap GENERATE.
- targetCompany: If you don't have access to this credential, contact UKG support.
- targetCompanyId: If you don't have access to this credential, contact UKG support.
Configure the integration
How to configure this integration.
Select the environment
-
Open the Integration Template Designer: Select Main Menu .
Note: If prompted, enter your Username and Password. Click Tap Log in. - Select the Manage tab > Atom Management.
- Select your environment.
Select environment extensions
Environment extensions define the connection path and properties that are always used by the integration.
- In Administration, click tap Environment Extensions.
-
In
Process Filter,
click tap
the magnifying glass

. - Scroll to and select the integration pack: .
Configure connection settings
- Select Connection Settings.
-
From Connection, select and configure both of the following:
Connection Settings
Connection Settings for the HCM People Import-v2 integration
Setting
Required
Actions
APIGatewayServer
Required
To change the default API gateway server:
- Clear Use Default.
- Enter the URL to the server.
Example:
<tenantURL>/api
HCMAuthenticationServer
Required
(Optional) To change the HCM authentication server:
- Clear Use Default.
- Enter the URL to the server.
Configure process properties
Process properties apply globally to all records that an integration processes. When you install the integration, you can define the parameter values or configure a prompt for the user to define the value when they run the integration.
- Select Process Properties.
- Edit the properties:Caution: Do not edit the default values of the AuthenticationProperties. By default, cookies are enabled and set the values for authentication properties.
Only while you test or design integration templates, should you edit the properties to connect to the authentication server and get the access token to execute APIs.
- From the Process Property dropdown list, select AuthenticationProperties.
- In GatewayDefaultPort, clear Use Default. Enter the path to the port for the API gateway.
- From the Process Property dropdown list, select HCMPeopleImport-v2Custom_External_HCMAuthenticationProperties to edit the properties to connect to the authentication server and get the access token to execute APIs.Caution: You must edit the authentication properties for the account that accesses the APIs and all employee groups. This information is part of the tenant details for the destination system.
Edit the following:
- username: Clear Use Default. Enter the username.
- password: Clear Use Default. Enter the password.
- api-key: The API key calls the REST APIs from the HTTP request header. Clear Use Default. Enter the key for the destination.
- targetCompany: Default = Not Mapped. Clear Use Default. Enter the short name of the company exactly as it is defined in the destination system.
- targetCompanyId: Default = Not Mapped. Clear Use Default. Enter the Company ID exactly as it is defined in the destination system.
- (Optional) HCMAPIErrorHandler properties define how the integration responds if an integration run exceeds an API limit.Caution: In most circumstances, do not edit the HCMAPIErrorHandler properties; leave these settings at their default values.
From the Process Property dropdown list, select _HCMAPIErrorHandler to change how to handle errors if integration runs exceed the limitations of an API.
- MaxRetry: This property defines the maximum number of times to retry integration runs if errors occur.
Default = 5.
To change the number of retries:
Clear Use Default.
Enter the number of retries up to a maximum of 5.
- TimeToWait: If an API limit is exceeded, this property defines how long to wait before sending the next API call.
Default = 60000 ms. If the API call has to be sent again, each repetition adds 60,000 ms (1 minute) to the wait time.
Examples:
1st TimetoWait = 60,000 ms (InitialTimeToWait)
2nd TimetoWait = 60,000 ms + 60,000 ms = 120,000 ms
3rd TimetoWait = 60,000 ms + (2 * 60,000 ms) = 180,000 ms
To change the initial wait time:
Clear Use Default.
Enter the wait time in milliseconds (ms) up to a maximum of 180000 ms.
- MaxRetry: This property defines the maximum number of times to retry integration runs if errors occur.
- From the Process Property dropdown list, select HCMLaborCategories to map labor categories to cost centers to pass to payroll.
Each employee can be assigned to up to six primary labor categories. The integration can use cost center trees to assign one or more primary labor categories to employees. Any cost center tree that populates a labor category is configured with one level.
In addition, labor categories can store manager fields for employee groups.
Caution:- The name of each labor category indicates the order; examples: Labor Category 1 is first, Labor Category 2 is second, and so on.
- The Name and Description of the job in HCM must match the Name and Description of the labor category. Do not use any of the following restricted characters:
/ | \ * ( ) : , ; # % ^ ? [ ] = - If HR Job is a labor category, you can use the default job (Cost Center 10).
- If the system includes or will include Healthcare Analytics, HR Job must be Labor Category 1.
For each Labor Category:
- Clear Use Default. Caution:
- If Use Default is selected, the value is Not Used and labor categories are not defined.
- Not Mapped means that a labor category is defined but is not processed by the integration.
- Select one of the following:
- Not Passed(default): The labor category is not passed to payroll.
- Not Mapped: Labor categories are defined, but do not import them.
- Cost Center 2—9: Map cost center fields to labor categories. Note:
- Cost Center 1 maps node-by-node to the business structure and includes the job. If no business structure corresponds to the default cost center, the integration run fails that record.
- Cost Center 10 is reserved for the HR job and is not available to be assigned to a labor category.
- Default Job(CC 10): Pass the labor category to payroll in the Default Job/Cost Center 10 column of the payroll export.
- Manager 1—6: Map manager fields to labor categories.
Format = LastName FirstName EmpId
Example: Smith John 123
- Pay Grade Name: (Optional) Export the HCM Pay Grade Name as a labor category to the payroll system. Note: In Australia, employees can be paid based on their age. This information is embedded in the pay grades that are configured in HCM. To pass the information to the Australian payroll system so that it can derive the pay rate, export the Pay Grade Name or Pay Grade Code as a Labor Category assignment.
- Pay Grade Code: (Optional) Export the HCM Pay Grade Code as a labor category to the payroll system.
Example labor category definitions
Example labor category definitions for the HCM Payroll Export-v2 integration
Labor category
Value
Labor Category 1
Cost Center 2
Labor Category 2
Cost Center 3
Labor Category 3
Manager 1
Labor Category 4
Default Job(CC 10)
Labor Category 5
Pay Grade Name
Labor Category 6
Not Mapped
- From the Process Property dropdown list, select HCMPeopleImport-v2_ProcessProperties to set process properties that must be configured before the integration can run. In most cases, use the default values.Caution: If you select Use Default for the connection settings and process properties, ensure that Value is blank. If Value is not blank, that value overrides the default value whether or not Use Default is selected or cleared. Example: If the default value is abc, but Value shows xyz, the integration uses xyz regardless of the setting of Use Default.
Process Properties
Process Properties for the HCM People Import-v2 integration
Setting
Required
Actions
DisqualifyNew
Not required
Default = false
To not process person records of new employees:
- Clear Use Default.
- Select Value.
DisqualifyExisting
Not required
Default = false
To not process person records of current employees:
- Clear Use Default.
- Select Value.
EnableTransactionAssistant
Not required
Default = true
To not submit import errors to Transaction Assistant:
- Clear Use Default.
- Select Value.
BatchName
Not required
Default = HCM People Import
To change the value:
- Clear Use Default.
- Select Value.
- Enter the batch name to group the failed records in Transaction Assistant.
IncludeEmployees
Not required
Default = Include all employees.
To process data for only a limited group of employees:
- Clear Use Default.
- Enter the person numbers, as defined in the source system, each separated by a comma (
,) but no spaces.Example:
13997,15556,20012
If DisqualifyNew or DisqualifyExisting are true, the number of imported employees may be reduced.
hcmSecPrflsDefMgr
Not required
Comma-separated list of security profiles of managers to be assigned a Manager role
Default = Department Manager
To change the values:
- Clear Use Default.
- Enter the security profiles, each separated by a comma.
hcmDisqTermPreDate
Not required
Employees who are terminated before this date are not imported. Set this property to prevent errors that are caused by processing outdated records.
Default =
2020-01-01.To set the date:
- Clear Use Default.
- Enter the date in
YYYY-MM-DDformat.
HCMReportsTo
Note: Formerly called hcmMgrIndxForRptTo.Not required
In Dimensions HCM, employees can be assigned to multiple managers, and this field maps to the type of manager as defined in Reports To Manager in HCM.
To change the value:
- Clear Use Default.
- Select the type of manager.
Examples: Manager 1, Primary Position Mgr, or Primary Position Mgr or Manager 1.
QualifyHCMDelta
Not required
Default = false, import all records.
To import only changed records, including for new hires:
- Clear Use Default.
- Select Value.
QualifyDeltaLookBackDays
Not required
The number of days to search from today and earlier to get changed records.
Default = 1 day
- QualifyHCMDelta must be set to true.
- Clear Use Default.
- In Value, enter from 1—31 days.
Caution: Interaction between the settings of QualifyDeltaLookBackDays, Skip Configuration, and By Minute can affect system performance. Example: If QualifyDeltaLookBackDays is 31 days, and By Minute is 5 minutes, the system could freeze. To prevent this, if By Minute is 5 minutes, QualifyDeltaLookBackDays goes back only to the last successful run._HyperfindType
Not required
Default = Hyperfind
Do not change this property.
_Hyperfind
Not required
Default = 1 (shown as blank) which indicates All Home and includes all active employees.
To use a Hyperfind query for another group of employees:
- Clear Use Default.
- Enter the ID of the Hyperfind. Note:
- Ad-hoc Hyperfinds are not supported.
- All Home does not include terminated and inactive employees even if they have totals during the period. To include these totals, configure a Hyperfind that includes terminated and inactive employees and select that Hyperfind in this process property.
- The maximum number of employees in a Hyperfind is 3500. To process more employee records, divide the population into smaller Hyperfinds to run sequentially.
To account for person records of future hires or terminations, see Configure Future Hires or Terminations.
PayPeriod
Not required
Default = 13(Today)
To change the pay period:
- Clear Use Default.
- Enter one of the following values for the pay period:
0 = Previous pay period
1 = Current pay period
2 = Next pay period
3 = Previous schedule period
4 = Current schedule period
5 = Next schedule period
6 = Week to date
7 = Last week
8 = Yesterday
10 = Range of relative dates
11 = Specific date
12 = Relative specific date
13 = Today
_PayPeriodSpan
Not required
To define a fixed span for which to get data:
- Clear Use Default.
- Enter the date span in
MM/DD/YYYY MM/DD/YYYYformat.
_Threshold
Not required
Default = 5000
To define a larger or smaller maximum number of people for which to get data:
- Clear Use Default.
- Enter the maximum number without decimals.
_HireDate
Not required
To map an original hire date to an accrual profile date:
- Clear Use Default.
- Select an Account Custom Date 1—6.
_AccountExtraField
Not required
Default = Account Extra Field 1
To select a different Account Extra Field to use as the HR Time and Labor Profile:
- Clear Use Default.
- Select Account Extra Field 1—10.
_HCMCostCenter
Not required
Default = Cost Center 1
To select a different HCM Cost Center as the source for the business structure and the assigned primary job:
- Clear Use Default.
- Select a Cost Center 1—9.
_UseOriginalHireDate
Not required
Assigns the oldest hire date for employees who have multiple EINs.
Example: An employee has worked for multiple locations at different times within an organization; each location has a different EIN.
- Clear Use Default.
- Select Value.
PreviewMode
Not required
Default = Yes
Do not change this property.
CountryCode
Required for text message-based multifactor authentication (MFA) with DIDP
Default = Not selected
To add the country-code prefix to all imported phone numbers:
- Clear Use Default.
- Enter the plus sign (
+) and the prefix number.Examples:
+1North America,+33France,+44United Kingdom,+61Australia,+86China,+91India.Note: If the phone number at the destination system is configured already with the country code, the country code in this process property is not added to the phone number.
_ExcludeEmployees
Not required
To exclude employees from the integration:
- Clear Use Default.
- Enter the person numbers each separated by a comma (
,) or number sign (#).
_HCMAllowTermLookBackDays
Not required
The number of previous days to check for terminated employees. The employees must be terminated on both systems.
Default =
5days.To change the number of days:
- Clear Use Default.
- Enter the number of days from 0—30 days. If you enter
0(zero), the integration does not import any terminated employees.
PassPositions
Not required
Whether to process multiple positions for employees.
Default = false.
To process multiple positions for employees:
- Clear Use Default.
- Select Value.
- Click Tap OK.
Configure cross-reference tables
Cross-reference tables (CRT) are the look-up tables that the integrations use to translate parameter values. One or more data values from the source system can be used to assign one or more parameters in the destination system.
A cross-reference table (CRT) translates parameter values in an integration as follows:
- Organizes data values into rows and columns:
- Maximums = 20 columns, 10,000 rows.
- Can combine values from multiple columns to determine a single output value.
- If more than one row matches a reference value, the first match is the output value.
- If no match is found, the output value can be null, or the integration can produce errors.
- Select Cross Reference.
-
From the
Cross Reference dropdown list, select any of the tables.
You cannot change the names of the tables.
_Lookup1—4
You can customize these empty tables to look up values for fields that are not included in the standard profiles, data maps, or other cross-reference tables.
Column headers:
Field1,Field2,Field3,Field4,Field5,Field6,Field7,Field8,Field9,Field10,Field11,

Field12,Field13,Field14,Field15,Field16,Field17,Field18,Field19,Field20
_Status
Maps the employee status from HCM to the employment and account status.
Column headers:
HR Status,Employment Status,Account Status,Notes_TimeZones
Column headers:
HCMTimeZone,DimensionsTimeZone -
Select Override to:
- Download the tables when you run the integration
- Edit the table cells in Extensions
- Repeat for other tables.
Configure data maps
(Optional)
A data map translates a data structure from the source format to the destination format. Examples: Map "PersonID" in the source to "Person ID" in the destination or "LastName" to "Last Name".
Each integration pack has a default data map. You cannot edit the default map for HCM integrations. If the predefined fields do not suite your requirements, use the default map as a guide when you edit or create a custom data map.
Best practices
Make sure that accruals balances remain accurate when hire dates change: See Configure Accruals Hire Dates.
Assign percentage allocation rules to specific employees: Edit the data map to map the Employee ID to the Percentage Allocation Rule.
Assign employee or job attributes to cost centers
You can assign any attribute in people information to cost centers, so long as the attribute is not effective dated and always applies the current date.
Examples:
- Cost Center 3 = Worker Type assigns pay rules to each employee.
- Cost Center 4 = Minor Rule Set assigns legally binding scheduling rules and penalties for minor employees, who are typically aged 14 to 18.
- Cost Center 5 = School Calendar for minor employees.
- Cost Center 6 = Forecasting Category Profile controls which forecast categories a manager can access.
You can combine these people attributes with the labor category mappings of the HCMLaborCategories process property.
Assign correct effective dates to primary labor accounts
To override fields to back date effective dates of primary labor accounts:
- If you use a custom script to map the EffectiveDate of PrimaryLaborAccount1, the integration fails.
- Instead, use the default mappings to PrimaryLaborAccounts because PrimaryJob is mandatory. The integration generates the effective dates based on changes to the primary job. If the labor accounts do not change, the integration does not generate new values for LaborCategory, PrimaryJob, and EffectiveDate.
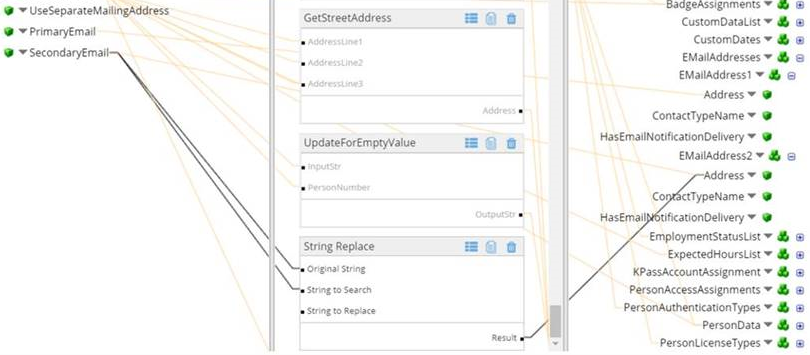
Override fields by a null output
A person record has PrimaryEmail which maps to EMailAddress1 and SecondaryEmail which maps to EMailAddress2.
If the integration imports only the SecondaryEmail address and not the PrimaryEmail address, insert a function to map EMailAddress2 to a null value as follows:
- Insert a String Replace function between SecondaryEmail and EMailAddress2.
- Map SecondaryEmail to Original String and String to Search.
- Map Result to .
HR Custom Fields 1—100
HRCustomFields1—100 each contain an Index and a Value field that you can use to map HR Custom Fields from HCM as needed.
Note: Map the HRCustomFields1—100 based on the configuration of the HR Custom Fields Definition in HCM. Use the Index(+1) output from the HRCustomField WFR API to map the fields rather than the sort order of the custom fields in the Employee Information in HCM.Example HRCustomFields1-100 mapping
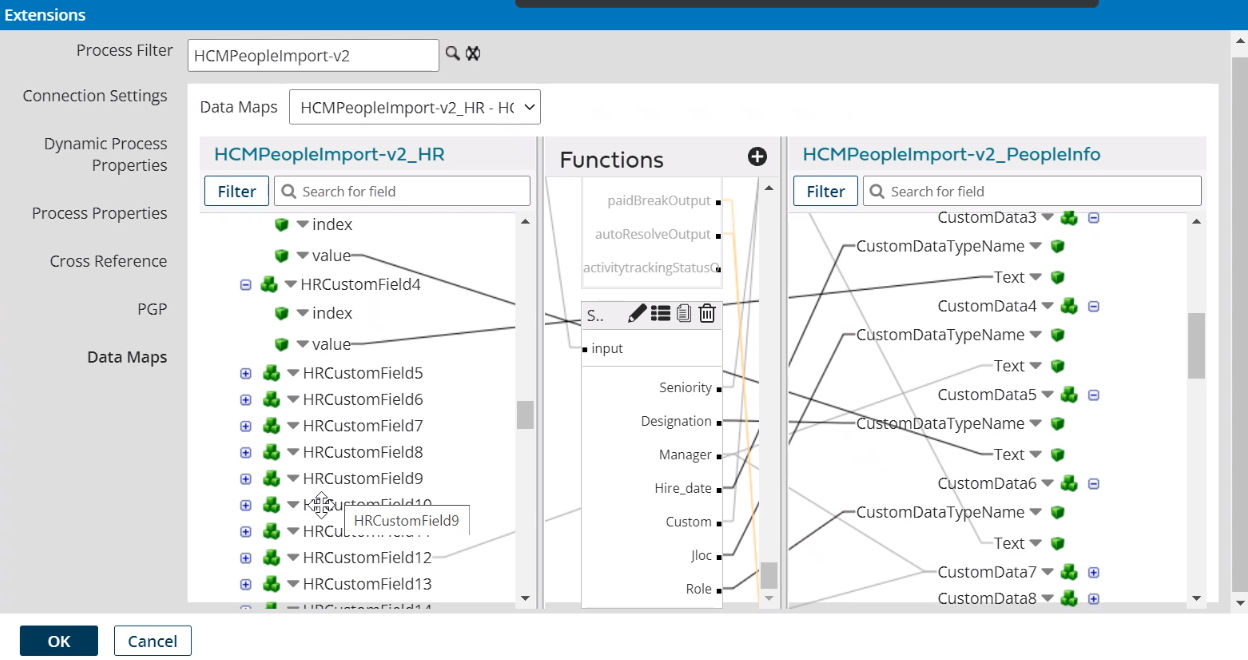
In the data map, do the following:
- Click Tap Create New Function.
- In
Function,
click tap
the plus button

to add an intermediate function. - From Category, select Custom Scripting.
- In
Embedded Scripting, do the following:
- In Select Script Source, select Use Inline Script.
- In
Language, select
Groovy 2.4.
- In
Script to Execute, enter the following:
Seniority = "Seniority"Designation = "Designation"Manager = "Manager"Hire_date = "Hired Date"Custom = "Only Custom Date Field"Jloc = "Job location"Role = "Role"if(input1.isEmpty() || null==input1){output1 = "#EMPTYVALUE#"}
- In
Script to Execute, enter the following:
- Add the following
Inputs:
input (Character)input1 (Character) - Add the following
Outputs:
SeniorityDesignationManagerHire_dateCustomJlocRoleoutput1
- Click Tap OK.
- Select and drag from the source fields to an input of the function.
- Select and drag from the outputs of the function to destination fields.
- Click Tap OK.
-
View or edit data maps
- Select Data Maps.
-
From the Data Maps dropdown list, select one of the following:
- Default map:
HCMPeopleImport-v2_HR—HCMPeopleImport-v2_PeopleInfo
You cannot edit the default map, so use it as a guide when you edit or create a custom data map.
- Map cost centers to business structure: HCMPeopleImport-v2_HR Schema—HCMPeopleImport-v2_Dimensions Schema
- Default map:
HCMPeopleImport-v2_HR—HCMPeopleImport-v2_PeopleInfo
-
Select

to expand or
to collapse levels.To expand all levels, right-click the green boxes icon
. Select Expand All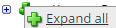
.The lines show the links between fields in the source (left side), any intermediate functions, and the destination (right side).
-
(Optional)
Caution: The default mappings are developed and tested based on best practices. If you make changes, you may get unexpected results. Modify and test carefully.-
Change mappings — When you customize a default data map, you can add fields only to the end of the map.
You can select and drag to change the links between the source (left column), function (middle column), and destination (right column) items. A single source field can link to multiple destination fields, but a destination field can link to only one source field.
-
Transform the data — A map can include intermediate functions that transform the data. Examples: Perform mathematical calculations on the values or get values from a cross-reference table.Note: To override a field — for example because you cannot delete it from a default map — insert a function that has a null output.
- In Function,
click tap
the plus button
to add an intermediate function. - From Category, select a category of functions:
String — Trim, add to, concatenate, replace, remove, split, or change the case of text.
Caution: Do not use special characters such as angle brackets (<or>) in data in cross-reference tables, data maps, and input files. These characters can make the integration fail.Numeric — Perform mathematical calculations on the data.
Date — Change the format or get the current date.
Lookup — Get data from a cross-reference table (CRT), document cache, SQL query, or define a key-value change.
Connector — Call a value from a connector to an application or data source.
Custom Scripting — Transform data by way of Groovy or JavaScript code.
Properties — Get or set process or document properties.
- Select the function from the list in the selected category.
- Click Tap OK.
- If prompted in Configure Defaults, enter the relevant values. Select a Caching. Click Tap OK.
- Select and drag from a source field to an input of the function.
- Select and drag from the output of the function to a destination field.
- Repeat to add another function.
- In Function,
click tap
the plus button
-
Change mappings — When you customize a default data map, you can add fields only to the end of the map.
- Click Tap OK.
APIs
This integration pack is an API to API integration that depends on the configuration of the source and destination systems. Knowledge of configuration and navigation in both environments helps you to make adjustments for testing.
This integration uses the following APIs:
|
Operation |
Endpoint |
Product |
Description |
|---|---|---|---|
|
POST |
v1/commons/persons/extensions/multi_read |
Dimensions |
Retrieve all employee information from extensions. |
|
POST |
v1/commons/persons/multi_upsert |
Dimensions |
Insert or update person records. |
|
GET |
ta/rest/v2/company/profiles?company=<company_name> |
Dimensions HCM |
Get all company profiles. |
|
GET |
ta/rest/v2/companies/|<company_name>/config/cost-centers?tree_index=0 |
Dimensions HCM |
Get all cost centers. |
|
GET |
ta/rest/v2/companies/<company_id>/employees/<emp_account_id> |
Dimensions HCM |
Get person records by employee ID. |
|
GET |
ta/rest/v2/companies/<company_id>/employees/<emp_account_id>/badges |
Dimensions HCM |
Get employee badge numbers. |
|
GET |
ta/rest/v2/companies/<company_id>/employees/<emp_account_id>/profiles |
Dimensions HCM |
Get profiles by employee ID. |
|
GET |
ta/rest/v2/companies/<company_id>/employees/<emp_account_id>/pay-info |
Dimensions HCM |
Get pay data by employee ID. |
|
GET |
ta/rest/v2/companies/<company_id>/employees/<emp_account_id>/compensation/total |
Dimensions HCM |
Get the base pay rate by employee ID. |
|
GET |
ta/rest/v2/companies/<company_id>/employees/<emp_account_id>/compensation/base |
Dimensions HCM |
Get the standard hours by employee ID. |
Data values
The data values can be:
- Directly imported from base fields
- Directly imported from custom fields
- Derived indirectly by way of reference tables or mapping functions from values in base fields
As well, some data are not imported, but are defined as:
- Static values (examples: Home Phone, All Schedule Groups). Static values can be default values that you can overwrite manually.
- Dynamic system variables (example: Run Time Date)
- Dynamic internal fields (examples: Current Pay Period Date or a value from another populated field)
Effective dates and profile assignments
Future dating is not supported, and some profile assignments do not have effective dates. Manage these dates by way of HR Actions.
HR Time and Labor Profile effective dates support all nodes and update assignments for new, past, and in-between nodes.
Seniority date = Seniority date
HR Account Status maps to the TLM Employee Status and Account Status as follows:
- New hire = Hire date.
- Rehire = Hire date or rehire date whichever is more recent.
- Update and the account status value changes = Current date.
- Termination = Termination date.
Job and Primary Labor Category effective dates:
- New hire = Hire date
- Updates = Current date
HR Default Cost Centers are not effective dated.
Employment terms: The effective date comes from the HR Time and Labor profile when the previous date expires.
GDAP is based on one of the following:
- Effective date of the HR Time and Labor profile for new employees
- Current date for updates
Effective dates are identified and described in the HCMPeopleImport data map.
Password handling
When temporary passwords are assigned
The integration assigns a temporary password to people as follows:
- First import of people records
- Updates to people records for people who are rehired. Example: The account status changes from Inactive or Terminated to Active.
Caution: If a logon profile prevents reuse of recent passwords, the integration may not be able to create the default temporary password for the rehired employee. Example: Any new password cannot be the same as the last five passwords.
- Updates to people records for people who change to roles that require a new account status and password. Example: The employee is promoted from a punch-only role, such as an employee, to a system-access role, such as a manager.
The next time the people log in, they use the default password but must create a new password.
Format of default temporary passwords
- When the Last Name and Date of Birth are available, the default temporary password is
Lastname@mmyyyy. The first character of the last name is in upper case, the rest is in lower case, followed by the@symbol, to end with the month and year of birth. - When the Last Name is available but the and Date of Birth is not available, the default temporary password is
Lastname@135792. The first character of the last name is in upper case, the rest is in lower case, followed by the@symbol, to end with the static number135792. - Last Name is mandatory, so it is always available to generate the default password.
- If the last name contains spaces or non-alphanumeric characters, the integration removes those spaces or characters. Examples: If the last name is
du Pont, the password is
Dupont@mmyyyy. If the last name is van Dyke, the temporary password isVandyke@mmyyyy. If the last name is O'Connor, the password isOconnor@mmyyyy.
Requirements for new passwords
For the default logon profile, passwords must contain all of the following:
- Uppercase letters
- Lowercase letters
- Non-alphanumeric characters
- Numbers
Passwords have the following limitations:
- Minimum length of 8 characters
- Maximum of 3 consecutive identical characters
- Maximum of 3 sequential letters or numbers
Conditions to update passwords
- Basic authentication: Passwords are reset to the temporary password when basic authentication is configured. Last Password Change is set so that when the people next log in, they must create a new password.
- Newly hired, rehired, and updated employees: Passwords are reset to the temporary password when employees are newly hired, rehired, or their account status changes from Inactive or Terminated to Active. Last Password Change is set so that when the people next log in, they must create a new password.
- Federated authentication: If single sign-on (SSO) is configured, the passwords are not reset. Federated authentication manages credentials so that people can use a single user ID and password to access multiple systems.
- Error handling: If an integration run fails, the temporary passwords for the affected people are not displayed in any error messages or in Transaction Assistant.
- If the password causes a failure: A password can cause the integration to fail if the logon profile has a complex default password configuration. Update the logic in the data map and run the integration again.