Terminating Employee Accounts
You might terminate an employee account for various reasons, such as a layoff or a resignation. Another common use for terminating employee accounts is to remove employees from an EIN when a company is configured with multiple EINs. Employee accounts can be terminated in one of the EINs, because the employee has been transferred and no longer works in that EIN.
Terminating an employee does not delete them from history. It simply removes their employee record with a terminated status, ensuring their data cannot be accessed. If the employee is rehired, their account history will be available for the rehire. When you terminate an employee through an Employee Import, HR Actions, or manual termination, all existing schedules that are in place after the employee's termination date will be deleted.
To terminate a user account, navigate to Employee Information. Click the checkbox next to the employee to be terminated and click the Terminate button on the page.
The termination details displayed when terminating an employee depend on what is enabled in the EIN maintenance page in the Termination Details widget. Your view may be different depending on what your company has enabled.
Termination Detail
On the Terminate Employee page, you will set the Account Status and Termination Date and add a termination reason. You can also determine if the employee is rehireable. Notes can be added. The ability to view termination reasons is tied to a user's Termination Reasons permissions in their security profile. This is set in the Termination Details permission, in the Employee section of the HR tab.
End Dates
If the employee's benefits are affected by the termination, you can determine the end date for coverage and the end date for deduction/earnings code calculation.
Manager(s) at Termination
The employee's assigned manager(s) will display in this section. If different managers should be listed, you can edit these fields.
Exit Interview
If the terminated employee has been given an exit interview, you can list the details here.
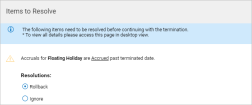
After all the settings are complete, click the Continue Terminate button. You will get a confirmation pop-up to continue with the termination. When you continue, if there are items requiring resolution prior to completing the termination, those will display with options to handle each instance.
Time pending on timesheets will provide a hyperlink to the timesheets, where the items can be resolved prior to finalizing the termination. This will also be available if handling the termination via an HR Action Termination action.
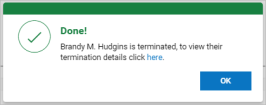
After resolving the items, and continuing with the termination, you will get a confirmation with a link where you can view the details of the termination. Clicking the link will take you to the Termination Detail page. On that page, you will have the option to rehire the employee (if they are eligible) or if you are terminating an employee in one EIN and rehiring them into another EIN.
During the termination, the system performs a series of checks in the employee's information for the following:
-
Ensure that there are no pending time off requests after the terminated date.
-
Ensure that there is no time entered on the timesheet after the terminated date.
-
For Extra Pay & Counter Adjustments entries that are available past an employee's termination date, you can Delete All Extra Pay & Counter Adjustments or Ignore.
-
If this employee is a manager, ensure that they have no time off requests awaiting their approval.
-
If this employee is a manager and has access to groups, ensure that they are removed from the group or the group is reassigned to a new manager. Also, ensure that the security profile and specific tasks are reassigned.
-
Ensure that accruals up-to-date equals the terminated date. (If the date has passed, it must be edited and put back to the terminated date.)
Termination Details Report Page
To view, delete, or add details to a termination, navigate to HR > Employee Maintenance > Termination Details.
Reinstating User Accounts
To reinstate a user account for a terminated employee, navigate to Employee Information. To display only employees who have been terminated, filter the page by setting the Employee Status column to = (equal) and Terminated. Press Enter to refresh the page.
Option 1: In Employee Information, check the checkbox in the row for the employee and click the Rehire button on the page.
Option 2: Locate and open the terminated employee from the list. in the Dates widget, where the termination date is shown, click the Rehire button.
Enter the date that the employee will be officially rehired and proceed. The employee will be rehired into the same EIN from which they were terminated. The EIN cannot be changed. To hire an employee into another EIN, use the Hire button and select a new EIN.
After you select Rehire, a success message appears. Their Account Status will automatically change from Terminated to Active. Check for any other settings in their account that should be changed.
In the Dates widget, the Terminated date will be cleared, and the rehire date will populate in the Re-Hired field.
Save all new settings when you are done making edits to a rehired employee.
Deleting a User Account
Deleting a user account removes their employee record from the system and makes it so the employee cannot be hired again using Rehire. If these employees are ever hired again, they will be treated like a new employee. Deleting a user account in the system will remove all historical data and is a hard delete from the system.
To delete a user account, navigate to Employee Information. If not already added to the page, select Add/Remove Columns. From the Available Columns selections, move Button: Delete Employee to the Current Columns section. After the delete option has been added, an additional icon will appear that allows you to delete a user account.
Click the Delete Employee icon to delete the desired employee. If the employee has records open or is part of an open pay statement, you must resolve those issues prior to deleting.
After everything is cleared, proceed with the deletion. You will be prompted with a warning message to continue or not. You will be prompted to enter your password to confirm the deletion.


